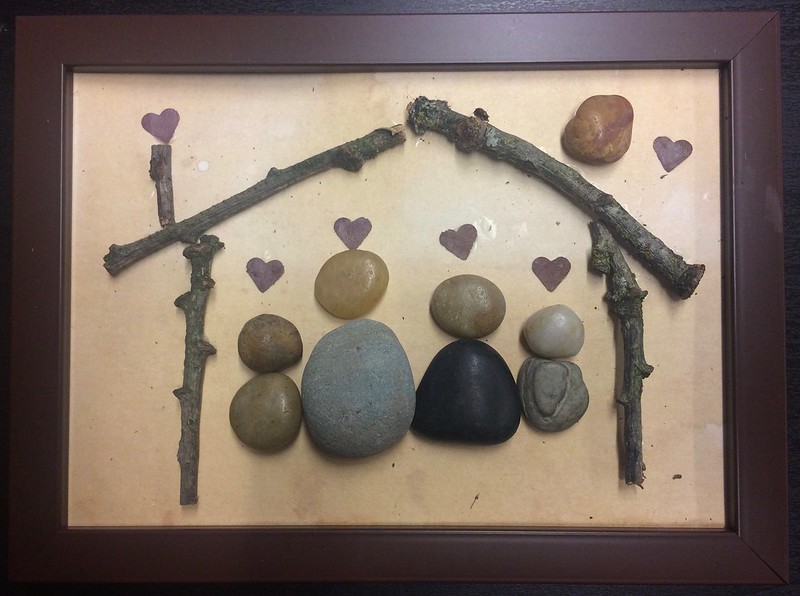
July 7, 2012

Colored sticks on Cardboard

Young children love to do collage and a great medium is just a bunch of colored sticks and colorful cardboard as a background. 

Actually as a vacation project you can use any type of sticks, from toothpicks to small twigs collected in your garden or nearby park. 

As the best technique I told the children to dip the tip of the stick in the glue and place it on the paper. This way there is no mess or sticky fingers and they can concentrate on their creation. 

Below are samples from my past students. They were free to do this project as many times they wanted.


June 12, 2012

Shape Friends


One of the activities I like to do about shapes is to ask my students to make a ‘shape friend’ using pre-cut colored shapes. The students can create their ‘shape friend’ any way they want. Hands can be squares or circles, bodies can be rectangles or triangles, they can use yarn or shredded paper for hair and so on.

After they create their ‘shape friends’ they have to share their work with the group, which they are really eager to do. I did half of the class in one day and the other half on another day as it was a big group. They had to say how many of each shape they used. They were free to add any other information like the name of the shape friend, if it was a boy or a girl, what was their favorite thing to do and anything they wanted to say about their shape friend. It was a great combo of Math and Language activity.

Besides talking about each shape friend individually we also did comparisons. I paired the students and they had to find out what was the same and different between their shape friends. I first modeled the activity to the group. Pairing students to talk about something is a great way to develop language specially if you have EAL students in your class as well as to create bonds between students.

I like those accordion arms and legs as it requires the students to use their fine motor skills. 

One of the students said ‘we can also write how many shapes we used’ so I created a simple worksheet, which was optional for them to complete. 

We put our finished work on a bulletin board and a few students went back there to compare and talk about their shape friend.


June 9, 2012

Painting with Cups

Another fun project we did this year was painting using cups. 

I set it up by putting paint on plastic plates and paper cups in them (recycled from a b-day party).
The size of the plates was really ideal for the cups.

We used 5 colors. I started by placing a paper under each plate and cup. Then the children could choose a color to start.

 The students began using one color and when they were happy with the results they could go to another color. The paper plates stayed in the same place. The students moved to the color they wanted taking their paper with them.

 They could use as many colors as they wanted until they were happy with their painting.

It is better to use cardboard paper as it is harder making it easier for the children to carry it from one color to the other.


June 6, 2012

Brown Bear Brown Bear read by children

Who can teach preschool and not read 'Brown Bear Brown Bear, What Do You See?' by Bill Martin Jr. with pictures by Eric Carl? It is magical, beautiful, musical, catchy, and you can read, sing it and act it out.

There are numerous activities we can do with this book. I have paper cut outs and props that go with the book for retelling.

But today the post is about the read along movie I made as the culmination of the shared reading about this fabulous book. I posted in youtube as there are no visuals of the children just their voices and it is a read along version.

I began using Garage Band but could not get pass the 'sharing the file' stage so I ended up using iMovie as I am more familiar with it and the file is saved on an m4v format, which is one of the formats Youtube allows for uploads.

Click on the picture to watch it on Youtube.

You can also watch it on vimeo below.


Brown Bear Brown Bear What Do You See from Amelia Mello on Vimeo.

The children were so into it! Congratulations EC readers! 

June 5, 2012

Painting with Spools

In exploring the classroom to find unusual painting tools we decided to try 'spools' that are part of the 'Laces and Beads' box. We found out that they make interesting prints.

We decided to use one single color. We chose black paint on orange paper. Nobody wanted a different background. It was interesting how they all stuck to the same colors, maybe a bonding experience. After they were ready we place them all together on a big table to dry and they looked really cool but I did not have any more battery on my camera to take a picture.

All you need is a couple of spools and a tray with paint.


June 1, 2012

Inspired by Georgia O'Keefe

Sometimes it takes one good tip from another teacher to change our way of presenting a project to our students. In reading the post from Sally's fabulous blog "Fairy Dust Teaching" about Georgia O'Keefe I solved a problem on how to present the 'poppies' project to them. I never knew how to emphasize that the flowers Georgia painted were BIG. Big for preschoolers can be relative. Then I read in Sally's post that Georgia painted the flowers so big that they would reach the edges of the paper. That was it!


Here is the link to Sally's post about O'Keefe.
http://fairydustteaching.blogspot.com/2012/05/flower-study.html


Here is how I did it:
I showed a power point of Georgia's flowers and poppies to the students.
When looking at the flowers I asked how big the flowers were. The students said, "veeery big" and the discussion went on until together we noticed that the flowers were so big that they touched the sides of the paper. That was the missing ingredient for the project. Thanks Sally!

The students got the idea and followed it without hesitation. The flowers grew and grew and some of them took over the whole paper.

We decided to use warm colors only. The students requested black for the middle as they saw it in O'Keefe's flowers. We used paintbrushes and regular A4 paper cut in an almost square shape. Most of the children naturally started by drawing the center of the flowers and then the petals.

Here are some of them.


We used the flowers on the cover of our Art Portfolios. 


May 31, 2012

Painting Kandinsky Circles


Who can resist painting "Kandinsky circles" when you are doing an art unit?


First I showed the students a power point with Kandinsky paintings while listening to Vivaldi’s Four Seasons. Then I stopped on the circles and we wondered about the painting. 


How did Kandinsky paint it? What was his inspiration? Which materials, mediums did he use? What size is the original painting? How many circles? Can we count them all? Which colors did he use? 
One of the students commented, "Wow, he (Kandinsky) really likes circles!"


To facilitate the work for my preschoolers I traced yellow lines to define six areas where the circles would be painted.

 When we were analyzing how Kandinsky did the circles we were wondering how he started, with a small circle in the middle, with the square, or with a random circle, or any other way? We decided it would be easier to begin either with the smallest circle in the middle or with the square traced over the yellow lines. 


Most students chose to start with a small circle in the center of the squares.
We used poster paint and cardboard paper as our mediums.

Circles are a great theme to explore through art with young children. According to several developmental scales and 'copy forms' tests the circle is the first shape mastered by a child.

Below are some of my students' Kandinsky inspired circles.


Once again this was a project involving a great process and amazing products.