March 7, 2012

World's Math Day

Today is World's Math Day and we did a lot of Math activities.

We did many activities and I am going to show two of them, writing numbers and shapes.

In preparation for writing numbers on a paper we did counting, rote counting and singing. The students traced numbers on the seed tray, traced them also on the sand number card and finally they wrote the numbers using the colors of the rainbow. They have also done numbers with play dough, counters, dot-to-dot and many other ways but not today.


I made a worksheet for the students to trace the numbers . Repetition is key but it needs to be fun. Out of everything I tried the rainbow number worksheets is what the students liked the most and it is only one sheet of paper that you can use many times. You can ask the child to use one color per day but if the child is motivated you can let the child trace the numbers with as many colors as the child wants in one go. I made two templates. One with numbers from 1 to 5 and another that goes up to 10.

Click on the picture below to download the template 1-5 from MediaFire.

If you want to use the back of the page you can have the students trace dotted numbers.
Click on the picture to download the template from MediaFire.


Here is one example of the student work from the template 1 to 5.

I made a sand number card by gluing sand on the numbers on a colored cardboard. It works well. You can also cut the numbers on sandpaper.

Click on the image below to download the template 1 - 10 from MediaFire.
On the back of this paper you can have the children trace and copy numbers 1-10.
Click on the image below to download the template from MediaFire.

And one more sample of student work.
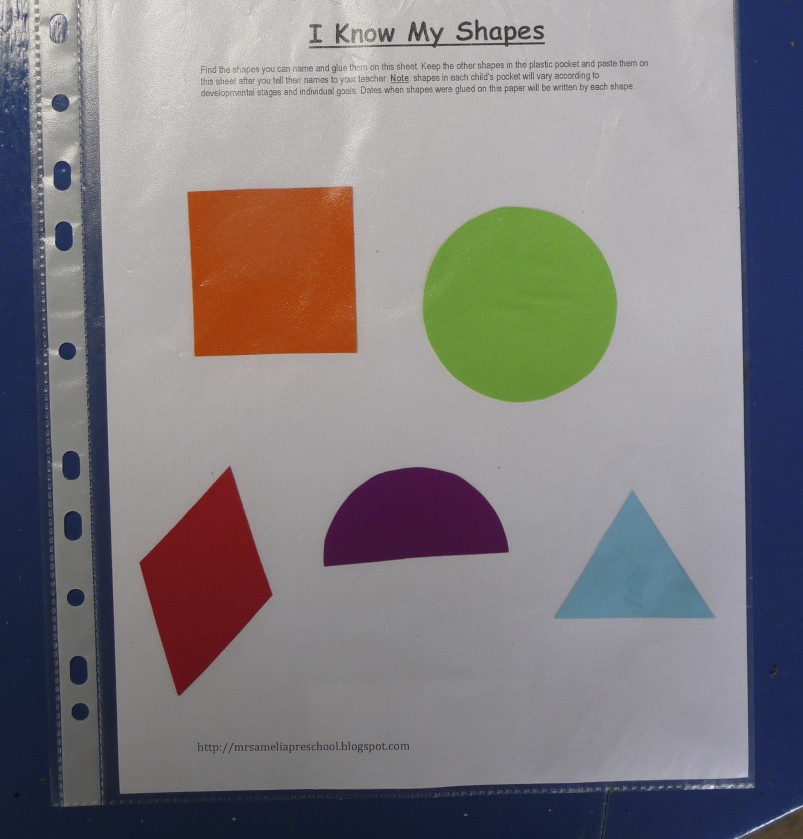
We also reviewed SHAPES!
And we recorded the shapes we know. This assessment is going to be placed in the students' portfolios.
I had the shapes pre cut and the students could choose which color they wanted and how they would place the shapes on the page.
Click on the image below to download the template from MediaFire.


If the child did know know all the shapes of their learning goal, we place the shape(s) the child did not know along with the sheet in a plastic pocket. In a month or two we can check again and if the child can name a shape then it can be pasted on the sheet.


I would also like to share an assessment that I did on counting and rote counting as this is one of the skills we usually work with preschoolers. This type of assessment allows you, the child and parents to see the child's progress in rote counting and counting objects from the beginning until the end of the school year. It is an idea for a portfolio entry.

I made this template if you are going to use dots. My students used the dot-to-dot markers for this assessment.
 I also made this template to be used with anything the child wants to count like fingerprints, cut shapes, seeds, etc.


Amelia Mello, M.Ed.

March 6, 2012

World's Spelling Day


Today it was World’s Spelling Day and EC wanted to join the rest of the school on this event. As this week we are investigating the letter T we spelled  words starting with T. We wrote them on the board and TV was one of them. The young children used wrote and drew TV in their journals. With that we also talked about shapes as TVs are mostly rectangles. Some even drew the remote control. Here are some examples below.


Older students chose to write words and I proposed using a worksheet that I call “Fabulous Four”, which I do not use frequently in EC but my students are so eager to write and are ready for some more structured work. They helped me spell the words on cards and then they copied the words form the cards. I did not limit them to words starting with T. Here are some samples.


Below is the template of the fabulous four worksheet. Just click on the picture to download it through Mediafire. I am sending it as a word document so you can modify it if you want.

March 3, 2012

Number Recognition Self-Assessment


I created these assessments to check the ability of a young child to recognize numbers randomly dispersed on a page. It is important that the numbers are not showed in order.

I use the same worksheet for pre-assessment and summative assessment as well. Once you see the worksheet you will understand how I can use it multiple times and how it shows student’s progress over time. I call it a self-assessment because the student is actively engaged in marking the page, receives immediate feedback and come out of the experience with a learning goal.

These Number Recognition Self-Assessments are great items for a Student Portfolio.

I created one assessment sheet for number recognition from 1 to 10 and another from 1 to 20.
You can download them both for free. Just click on the images below.


Assessment is a vital component in teaching. The first step in teaching is to have a teaching goal, an objective; what we want the students to know. Then we need to assess what the students already know, tailor the lessons/activities/learning engagements and finally we assess what the students have learned.

The Number Recognition Self Assessment that I created consists of the student looking at numbers out of sequence and saying their names. The student will color the numbers he knows and we celebrate his knowledge. I might say “Wow, look at all the numbers you already know, isn’t it great?” Even if the child knows only one number I can say, “Wow, you already know one of the numbers”. And if the child does not know any number I can say, “Wow, look at all the numbers you will learn in EC”.  The most important thing is to build the child’s confidence in his ability as a learner.

The numbers the student does not know are the learning goals for that particular student. The teacher plans activities to have the students practice number recognition. I tailored the activities according to students’ interests or according to what I think they will be intrigued about.

Amelia Mello, M.Ed.

March 2, 2012

Reading Behaviours


One of the most powerful tools in assessment is ‘observation’ and this is always a fascinating experience to me. I see so many things and behaviors that I would not observe otherwise.

Today I will talk about my observations of ‘reading behaviors’ in my Early Childhood class.

When I say reading behaviors I mean how children are interacting with print material.  For example, how children are handling books, if they seem engaged in looking at the book, if they are laughing at a funny illustration, if they are demonstrating story reading behaviors by talking as if they were reading the words and many others. There are many behaviors, but my goal is not to bore you by talking about them but to show some of them through pictures.

This boy was having a great time reading one of Spot’s books. He likes humorous books and it is a delight to hear him laugh heartily at some of the illustrations.
These children had free reading time and they chose to read non-fiction books. They were extremely engaged looking at the pictures and talking about what they were learning with the books.

Those two girls were working together to read three letter words. They worked collaboratively without my help until they finished the task, which took a significant amount of time for this age.


This boy was in the library and he just sat with his legs crossed like a like a grown up man. I am almost certain that this reading behavior is modeled to him at home and he picked it up and is unconsciously mimicking it, which is fabulous. I had to add the out of focus picture because he was reading a book about Jet Airliners, not the typical choice of book for a 4 year old.

During DEAR time (Drop Everything And Read) when we all sit with a book and read this darling boy was having what I defined as a ‘sensory’ reading of the book. He looked at the book the right way up, upside down, front to back, then back to front, smelled the book, brought it close to touch his face and finally he opened the book looked at the page and just ‘listened’ to it, for a while.  Isn’t it the most amazing thing?

I just love EC children! 

Amelia Mello, M.Ed.

February 29, 2012

Beginning Sounds of Our Names


Children’s names are the most important words for them. So when you review the beginning sound of their names they are usually very excited about it.

The last time we reviewed the beginning sounds of our names I started by placing their letters in the middle of the circle and they had to find their own.

Then we used seeds to glue on the letters.

After the seeds dried the students worked in small groups. I precut pictures of objects that had the same beginning letter of their names and placed them all in the middle of the table. The students had to first sort out the pictures and then glue them next to their letter sound.

They shared their work in their small group and then with the whole class and we decided to place them on a bulleting board.

I thought the students would not look at the work anymore but once in a while a student gets our “pointer”, (the little blue hand you see in the picture) and they start looking at the seed letters and name the pictures around it. That is realy gratifying to see.

I like to have them revisit the board with varying approaches, for example I ask the children to say the sounds of the letters as I point to them, then they say the word out loud.  We spelled words like cat, mat, hat, fat, sat, can, fin, dad, Sam, ham, mad, and a few more.

This will go in their portfolios as a result of the enthusiasm the students showed towards their work.

February 28, 2012

Stencils! Fun and Easy!


There is something about stencils that is unique and fascinating. You create precise designs using a dabbing technique without the need to draw anything.

All you need is a stencil, paint in a small container and a piece of foam.

If you blue tack the stencil on the paper it works even better because the stencil won’t slide. Put only a very small amount of blue tack or the paint might run underneath.

I have a box full of stencils and the students wanted to use the butterfly probably because we have been talking about the life cycle of butterflies.

There are so many ways you can use stencils, from being part of journal writing to describing, talking about it, or simply creating a beautiful image.

We used the butterfly stencil on an A4 paper. I could have done 4 different colors of the same butterfly on an A3 paper. It all depends on what your objective is. Mine was just to promote one more way to make a butterfly and observe how one side looks like the other (symmetry).

Amelia Mello, M.Ed.

February 27, 2012

Watercolor Rainbows


Watercolor Rainbows artwork is a win win situation. It is easy, simple and fun to paint a watercolor rainbow and the end result is beautiful.

We made rainbows because of the letter ‘R’. Using the Starfall website we watched the letter sound ‘R’ animation and rainbow was one of them.

After some discussion, knowledge sharing, talking about our experiences with rainbows and looking at books with rainbows we decided to make our own. 

The students already knew how to work with watercolor paint so the technique was not a problem. To help them know which colors to use I projected a rainbow on the white board and I also made a model with their help. The key clue is to tell the students to start painting the rainbow at the bottom with the purple.


Here is the result. Twenty-two beautiful rainbows!

Today the students shared their rainbows with the whole group and they all received a well deserved round of applause. They were proud of their work as they should be.

The students decided to put their work in their portfolios.

Amelia Mello, M.Ed.

February 24, 2012

Kindle Books in the Classroom

I recently found adorable Kindle books by Gerald Hawksley on Amazon. He actually wrote a few books especially for the Kindle format but he also has books that are paperback versions.
 
I have the books on my Kindle for Mac and I project them on the white board. The children love it. Gerald’s stories are perfect for Pre-K and K. They are entertaining, have colorful illustrations, lots of rhyming words and you can use them in a lot of different ways.

In my opinion Kindle books projected on a screen is a similar experience of reading big books, only better as the screen brings a whole new dimension to the book viewing. All the students can see the book very well for one and watching the colorful images of a book with print being read to you on a big screen in a dim lit room is a cool experience, almost like a movie. Only better because it is a ‘book’ and the teacher can work with a wide variety of approaches.

In the picture above I asked one of my students to point to a specific word.  I can have a student point to a beginning sound, ending sound, rhyming words, point to details on the illustration, and so much more.

I love using Kindle books in the classroom but not all picture books with a Kindle version come out well on the screen especially if they are conventional books with illustrations that spread over two pages.

Below are the books from Gerald Hawksley that I have bought so far and I recommend:
Happy Animals
If You Have a Hat
Happy Hat Day
Silly Monsters 1,2,3
Silly Monsters ABC

If you have any good recommendations of Kindle picture books for pre-school please drop me a note at mrsameliapreschool@gmail.com

Amelia Mello, M.Ed.