Who
can resist painting "Kandinsky circles" when you are doing an art
unit?
Pages
▼
May 31, 2012
May 28, 2012
Wooden Cakes!
We have been exploring art mediums and we used small wooden
pieces to create little faces inspired by Karel Appel as I posted before.
May 23, 2012
One Line Design - inspired by Paul Klee
The One Line Design lesson that I do based on a lesson from MaryAnn Kohl's book "Discovering the Great Artists" is one of my favorite art lessons.
May 21, 2012
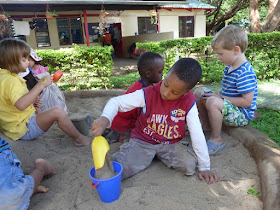
Exploring Capacity
What better place to explore capacity than a sandbox? I'm fortunate to have a large sandbox at my school. First we all sat around the sandbox and we made all kinds of inquiries. I carried out all the explorations as the children watched. I did it in a very excited manner to fire them up, so by the time I finished they were all very eager to try it themselves. They could then work in paris or independently. I believe a teacher's genuine enthusiasm is key to motivating students.
Those two girls worked together.
They took turns.
The end result was a birthday cake with a little twig candle in the middle.
"I want a real measuring cut" so I gave her one.
"
"This will take a long time and I can fit many spoons of sand in the bucket. I do not think I want to find out how many spoons fit in here."
"Oooh this is fast!
May 20, 2012
Newspaper Sculpture
We are exploring art mediums to express ourselves. We explored paintings and sculptures thought books, internet and by observing some of artwork I brought from home (two paintings and a sculpture). I asked the children about the uses of newspaper and if they could be used to create art. They said no. Then and I showed the students how to make a newspaper roll. Then I asked the students if newspaper rolls could be used to make artwork. It did not take long until one child said that we could stick the newspaper rolls together.
May 17, 2012
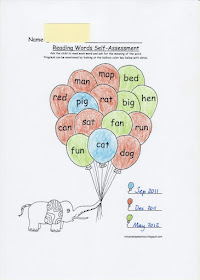
Reading Words Self-Assessment
I use this assessment with PreK and KG students 3 times a year. At the beginning (after a few weeks of school), middle (usually December or January) and end.
You color code according to the date so you and the students are able to see their progress. Give the child about 5 seconds to read the word then move to the next. young children usually sound out the words, which means they say each sound and then say the word.
At the beginning preK I do not expect the children to read any of the words but as the year goes on we begin to see progress. At the end of the school year I expect them to be able to read most of the words independently by slowly sounding them out.
At the beginning of Kindergarten some children might not be able to read any of the words but they usually progress fast and by the end of the school year I expect them to read all the words accurately and in less than 4 seconds by sounding them out loud or internally.
Below is an example of a finished assessment. This assessment might go in the child's portfolio.
May 16, 2012
Art Appreciation using Technology
I made a Power Point Presentation for my students about Paul Klee’s works, to introduce the ‘one line design’ concept to them. The Power Point included the “Dramatic Landscape”, which is one of Klee’s paintings that better exemplifies the abstract one line design. The Power Point was on the desktop of one of my classroom computers and right after I projected it on the white board, wanted to sit at the computer and watch it again. Today students were still asking to watch the presentation.
I made the Power Point using scanned pictures from a
postcard collection of Paul Klee’s work that I got at a museum as well as pictures
I found on the Internet.
Here is the Power Point I did that you can download from Mediafire. Click on the title below.
I unintentionally discovered that this is another great way to promote “Art Appreciation” in the classroom. Some students sat together at the computer and were talking to each other about the paintings.
The idea of the ‘one line design’ lesson comes from MaryAnn Kohl’s book “Discovering Great Artists”, which I will post about later.
May 15, 2012
Connecting the Dots of Knowledge
Connections! Learning taking place! Applied knowledge! Isn't
that what all teacher want to see happening with their students? Here is one
example from last week.
Early in the morning many students were using beads and
laces to make chains. They would do and undo them until two students said they
wanted to share what they had done.
Beads and laces are also a great fine motor activity.
One of the girls began to talk about her chain and she said she used a bead like the cube we have in our 3D shapes box. Then she showed the cylinder-shaped and sphere-shaped beads. Of course she hadn't planned to discuss the "3D beads," but rather is was a connection she made once she started to talk about her chain.
One of the boys also made a chain and made all the connections with the shapes we have been exploring. He also noted his chain was longer than the girl’s chain, and they began comparing who used more cylinders.
From this day, on almost every day we’ve had someone making a chain and asking to share with the group. The end result is that the students found a way to review 3D shapes with something they were interested in; thus the initiative came from them and not from the teacher.
This week a girl called me to show she found the 'primary colors' in the beads.
I had also done a “shape hunt’ around the classroom and other relevant activities such as comparing shapes properties, which ones can roll, etc, but to me the best learning experience are the ones initiated by the children.
I use the word “connection” often and frequently ask them to draw parallels with past learning. It is wonderful to see this becoming established in the student’s minds.
I never ceases to amaze me how children are so ready and eager to absorb knowledge. As Maria Montessori used to say: "Children are like sponges absorbing everything around them. They have absorbent minds”.
May 14, 2012
Sensory Collage
May 11, 2012
May 9, 2012
Painting with Cars
Using toy cars to paint is a lot of fun! You can suggest this project any time you are investigating about transportation.
May 8, 2012
Wooden Faces
A walk outside was all it took for us to collect wood chips fallen
from a branch that was cut off a tree. We were not sure of what to do with them
but who could resist such interesting shapes and texture? Now that we are doing
an art unit and talking about art and art mediums all it took was for one of
the students to browse our box of artwork photographs and make a connection between
our wooden chips and the work of Karel Appel entitled “Questioning Children”.
May 7, 2012
Sand Collage
Exploring texture is a lot of fun as well as finding art mediums that can create textured artwork.
After reading the book "The Shape of Me and Other Stuff" by Dr. Seuss one of my students made a comment about the wavy lines on the last page. I said it would be fun to explore lines and texture at the same time. One student said we could use glue and sand to make wavy lines. I asked her how she came up with that idea and she said she just did. That's great. I love to use students' ideas.
May 6, 2012
Words on Your Plate
I created a game that I call “What’s on Your Plate” to have
my students practice building three letter words and writing them, which they
did on a paper plate. I wrote consonants and vowels on blank dice. The children had to throw the dice and try to form a word. If a word was formed the child would write the word on a paper plate.
If you cannot find blank dice you can make them out of paper.
I placed the dice in a cup. The students had to throw the dice in the plate and try to arrange them to form a word. Then they would write the word on the paper plate.
May 2, 2012
My Mondrian
May 1, 2012
Letter Sound Assessment
Assessing the knowledge of letter sounds is extremely
important in preschool. If a child knows the sounds of the letters and has
the ability to orally blend and segment sounds to read and write words then
this child is likely to be successful in reading and writing in Kindergarten.
Of course I am going to take into consideration all the important
reading and writing behaviors expected for the age of the child but for that I
use different assessment tools.
This post is to share with you what I have developed for
assessing the knowledge of letter sounds.
With the template I created the child (or the teacher if it
is too tiring for the child) colors the letters as the child says its sound.
Once the letters are colored the child can ‘see’ how many
she or he knows and the others become a learning goal.
Once the child colors all the letters it gives the child
such a sense of accomplishment, and by then the child is usually doing guided
reading which is heavy in comprehension, word attack strategies and becoming an
independent reader.
I usually use this assessment at the beginning of the school
year, December and end of the school year, usually end of May or June.
The
child shown below is moving to another country so we had a short conference
about her portfolio and we decided we should complete all the assessments that
I will do later in the month with the other students.
Below are the templates for assessing knowledge of Upper and Lower case letter sounds. Just click on the images do download the template.
Here are the blank templates for you to write the letters as you teach them in your class.
I suggest to demonstrate the assessment to the class before you do it with the individual student.
If you have a projector and a white board or an interactive board you can easily do this.


